Recipe: Experiment Factory for Stanford
03 Nov 2016
About
While the current verison of The Experiment Factory is great for those with a login (util the second version is released) there are limited options for researchers to deploy these web based experiments.
To ease development, with help from some of our open source collaborators (thanks @tangi75! we have a simple version that can be deployed to a local MySQL database, and integrated into the Concerto platform (for details about Concerto deployment, see here. While this recipe will include details for Stanford researchers to deploy experiments to the Stanford static web server, the general workflow can be used for any static location and MySQL database.
Requirements
- Python (version 2.7) for generating your static files
- a MySQL database with read/write access
- a web server to put static files with Php
Instructions
0. Get your space.
At Stanford, you can use your personal or group AFS folder. You will need to follow the instructions here for personal (or group) to enable the cgi-bin</a>. This is an overly silly way of saying “make the language PhP work in this folder called cgi-bin”
1. Create your database
You can also ask for your own MySQL database with just a few clicks! Click on “Request MySQL Service.” Note that you must have affiliation with a Department, Group, Service, or Class. If you don’t have one, this basically means getting a faculty or staff to join forces and create a group.
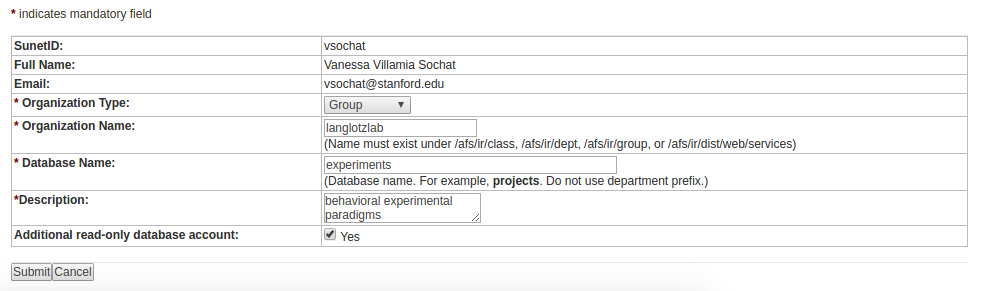
Make sure to click the box that says “Additional read only database account” if you are interested in adding some kind of reading client or application. Once you click submit, it’s going to give you a big list of read and write credentials that looks something like this:
MySQL Username	xxxxxxxx
Initial Password	xxxxxxx
Read-Only Username	xxxxxx
Read-Only Account Password	xxxxxxx
MySQL Server Name	mysql-user.stanford.edu
Database Name	xxxxxxxxxx
DNS address	xxxxx
Keep a link to the MySQL console handy, because without any other query tool, you will find it easiest to go here to look at and export data. I like to have a hidden file called .secrets that is always in my .gitignore file associated with the repo I use to generate the experiments on my local machine only to keep them safe.
2. Get your experiments!
You will need to install and use the experiment factory python functions to generate your experiment. To make things even easier, I’ve made a simple repo to get you started! Note that Python 3 is currently not supported. If you are new to Python, check out some options for installation here, and then go forth:
pip install expfactory
git clone https://www.github.com/researchapps/template-experiment-mysql
cd template-experiment-mysql
Add in the MySQL Username and Initial Password into the corresponding fields DATABASEUSER and USERPASSWORD, along with the DNS address to replace localhost in the file database_connect.php:
<?php

$dbc = mysql_connect('localhost', 'DATABASUSER', 'USERPASSWORD');  // host, user, password
mysql_select_db('DATABASETABLE', $dbc); // databasename

// get the table name
$data_table = 'expfactory';
?>
Then you can
choose your experiments and make sure to remember the experiment ID (exp_id) of the ones that you want to add. For example, my favorite is the Tower of London, so I’ll remember tower_of_london.
3. Generate the static files
Now that you have expfactory installed, and have decided on your experiments, you should generate the static content. First, do a double check that you are running some flavor of Python 2.*:
$ python --version
Python 2.7.12 :: Anaconda 4.2.0 (64-bit)
For this example, I’m going to write output to a folder on my Desktop, because then I can easily move it to the group webspace and delete it.
cd template-experiment-mysql
python setup_battery_for_webserver.py --output /home/vanessa/Desktop/tol --experiments tower_of_london
If you have more than one experiment, you can separate them with commas. You’ll see some output about downloading repos and generating the files:
Downloading expfactory repos...
Generating base...
WARNING: config.json is missing field name: volatile_bandit
WARNING: config.json is missing field reference: volatile_bandit

.
.
.

Generating experiment and battery templates...
Battery generated in /home/vanessa/Desktop/tol
And then you should have your static content ready in the output folder specified, in this case /home/vanessa/Desktop/tol
4. Generate the table!
Before we upload files or test your experiment, we need to create the table! First log in to the MySQL console. You will see this screen, the phpMyAdmin console:
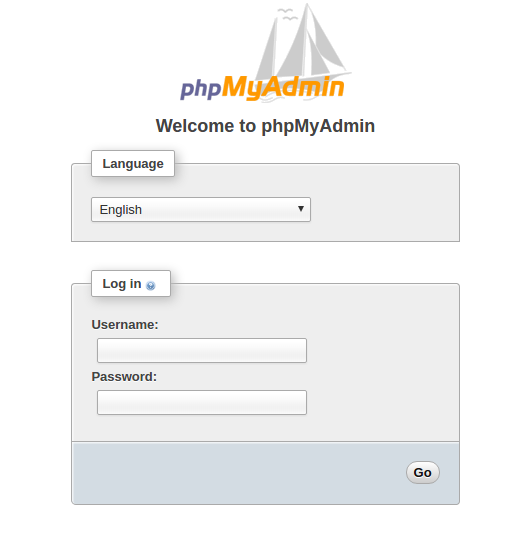
where you can log in with the username and password you generated. Once you see the console, you will need to select your database in the left column, which should be some amalgomation of your group name and the table name you selected when you created the database. Once you have selected the database, then click on the SQL tab to run a command. What command?
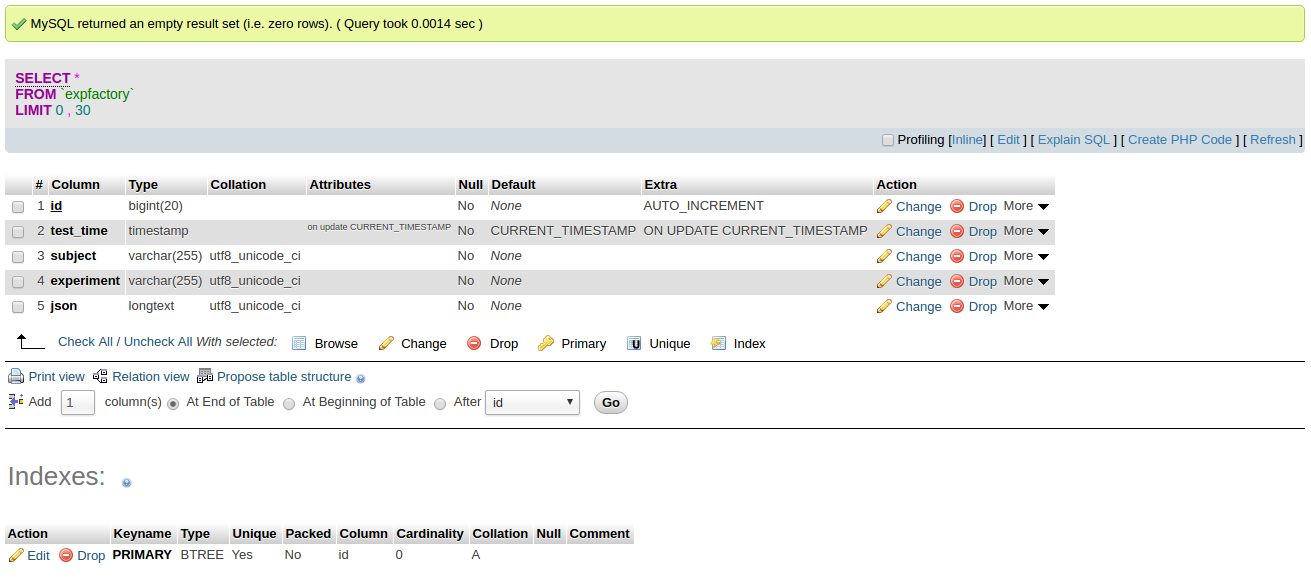
If you look at the file create_expfactory_table.sql this code is your command. You need to replace DATABASENAME with the name of your database:
CREATE TABLE `expfactory` (
  `id` bigint(20) NOT NULL AUTO_INCREMENT,
  `test_time` TIMESTAMP,
  `subject` varchar(255) COLLATE utf8_unicode_ci NOT NULL,
  `experiment` varchar(255) COLLATE utf8_unicode_ci NOT NULL,
  `json` longtext COLLATE utf8_unicode_ci NOT NULL,
  PRIMARY KEY (`id`)
) ENGINE=InnoDB DEFAULT CHARSET=utf8 COLLATE=utf8_unicode_ci;
Note that if you run this command from one level up (when logged in, but not connected to the database) you would need to specify the address of the (database).(table):
CREATE TABLE `DATABASENAME`.`expfactory` (
  `id` bigint(20) NOT NULL AUTO_INCREMENT,
  `test_time` TIMESTAMP,
  `subject` varchar(255) COLLATE utf8_unicode_ci NOT NULL,
  `experiment` varchar(255) COLLATE utf8_unicode_ci NOT NULL,
  `json` longtext COLLATE utf8_unicode_ci NOT NULL,
  PRIMARY KEY (`id`)
) ENGINE=InnoDB DEFAULT CHARSET=utf8 COLLATE=utf8_unicode_ci;
Details, details, my good Watson! You should then be able to click on the table name in the left column, and see all the new fields! And that it’s empty.
Now let’s move on to deploying our experiment to connect to it!
5. Upload your files
You will want to use some flavor of FTP/sFTP to upload your files to AFS. There is very good documentation about options for that. They don’t have very good documentation if you are using standard Linux, so in this case I am going to use scp.
cd /home/vanessa/Desktop
scp -r /home/vanessa/Desktop/tol username@corn.stanford.edu:/afs/ir.stanford.edu/group/YOURGROUPNAME/cgi-bin
This will move the folder tol and the entirety of its contents into cgi-bin, meaning there is a folder called cgi-bin/tol.
6. Test your experiment!
You should now be able to go to the static folder address, in this case my experiment is deployed at tol on my lab webspace (http://web.stanford.edu/group/langlotzlab/cgi-bin/tol/) and participate in the experiment! If you want to do a test, don’t specify an ID, and this will go in the database as an id of 0:
http://web.stanford.edu/group/langlotzlab/cgi-bin/tol
if you want to have a participant run through it (for realsies) then you can have them complete a link with the uid parameter appended:
http://web.stanford.edu/group/langlotzlab/cgi-bin/tol/?uid=123456789
We can now finish the experiment, making sure to press enter until you see a blank white screen, and then look at the database console to see the result:
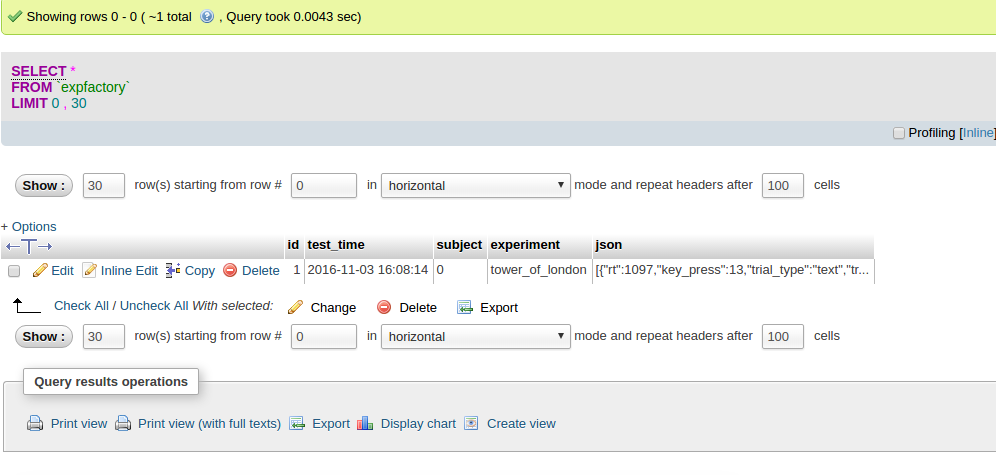
If we look closer, we see that the main portion of the result, the experiment field, is just a json string:
 . This means that you can give the read only address to someone else in your lab (RAs, students, etc) and they can use it to connect to the data via their software of choice (Python, R, etc.) and work with the data. Pretty darn neat, right?
You should be sure to back up your data, and we strongly reccommend adding some user authentication and asking users to log in before completing your experiments.
7. Get help!
Do you need help? Support? Research Applications at Stanford is here for you! Please post an issue if you have a feature request or question, and don’t hesitate to reach out to us.